Everyday Whole Grain Bread

Since I returned to Umbria almost two months ago, I have been making a variation of this bread every week. I have been playing with my recipe to get it just right, and now each week I make three loaves of what I call my “everyday” bread that we can toast, nibble on as a snack throughout the day, or enjoy with cheese and cured meats.
My everyday bread is not anything like the square shaped, soft sliced bread you might buy in a bag at the grocery store because I like bread that you can sink your teeth into, that is healthy for you, but that tastes great too. I have made wholewheat bread in the past that was so dense it was difficult to eat, but I think the addition of some bread flour as well as both a starter and dry yeast resolves that problem.
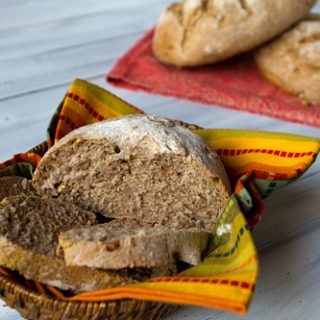
This bread has a good crust, but the crumb is tender enough to please anyone. Being in Italy, we deal in metric weight and since we are bread baking and not baking fancy desserts, the measurements do not have to be exact so I will give both measurements. In my recipe I use 1/2 wholewheat flour, 1/4 bread flour, and 1/4 alternate whole grain flour.
For my alternate flour choices, I have used farro flour, millet, and 10 grain cereal flour with great results. This week I added oat flour to make the bread that is shown in the photos. This bread can also be varied by adding walnuts which my husband loves as the nutty bread goes so well with cheese or cured meats, or by adding raisins or other dried fruit which works really well when toasted.
I generally bake my bread one day, and once it is cool I slice it up and freeze two of the loaves. I then take a loaf (or half) out of the freezer when we need it, and these three loaves will last us until the following week when I bake my bread again.
I do use a sourdough starter as well as active dry yeast in my bread recipe, but I have also used a simple biga or starter with good results and have included the recipe for the biga below. My sourdough starter has been with me for three years now (bought from King Arthur Flour Company), and I even dry it to bring it back and forth to Italy every 6 months.
The amount of water used will change depending on your choice of flours, so simply use enough to create a workable dough that is not too sticky. The amount of water listed is approximate.

Buon Appetito!
Deborah Mele
Everyday Whole Grain Bread
A high fiber, healthy bread you can make at home.
Ingredients
- 500 Grams (1 Pound) Wholewheat Flour
- 250 Grams (1/2 Pound) Bread Flour
- 250 Grams (1/2 Pound) Alternate Healthy Grain Flour (See Above notes)
- Good Pinch of Salt
- 1 Tablespoon (1/2 Ounce) Active Dry Rapid Rise Yeast
- 1 Cup (About 8 Ounces) Sourdough Starter or Biga
- 500 ml (About 2 Cups) Warm Water
- 1 Tablespoon Olive Oil
Optional :
- 2 Cups Coarsely Chopped Walnuts or Raisins/Dried Fruit
Biga:
- 1/2 Teaspoon Active Dry Yeast
- 1 Cup Lukewarm water
- 2 Cups Unbleached, All-purpose Flour
Instructions
- For The Biga: Mix the yeast and water together, and then slowly start adding the flour, mixing well.
- Cover with plastic wrap and let sit at room temperature for up to 6 hours and then refrigerate overnight.
- For The Bread: Bring the biga out of the refrigerator an hour before you plan to make your bread to allow the biga to come to room temperature.
- Use one cup for this recipe, and refrigerate the rest to be used within 7 days.
- In a large bowl, add the flours, yeast, salt and stir to mix.
- Add the starter or biga, olive oil, and one cup of water.
- Continue to stir and add remaining water until the mixture comes together as a dough.
- If using the chopped walnuts and/or fruit, add it now and stir into the mixture.
- Dump the dough onto a lightly floured counter or bread board and knead by hand adding a little additional flour as kneaded to keep from sticking. Knead for about 7 to 8 minutes or until the dough is smooth and no longer sticky.
- The dough will be fairly firm to knead. Lightly oil a large bowl and place your dough into the bowl.
- Cover with plastic wrap and a kitchen towel and let rise in a warm spot until doubled, about an hour and a half.
- Take the dough from the bowl and divide it into three equal pieces.
- Shape each loaf into an oval or round and place on lightly floured baking sheets.
- Cover the loaves with kitchen towels and let rise about 45 minutes.
- During the last 15 minutes of rising, preheat the oven to 400 degrees F.
- Use a bread lame or sharp knife and cut three equal slits across the top of each loaf to allow the bread to rise as it bakes.
- Lightly dust the top of each loaf with a little flour, and bake for about 30 minutes or until a thermometer measures the interior of the bread at 190 degrees.
- Cool to room temperature before slicing.
